Best Stratagems Helldivers 2 Tier List (2026 Guide)
Every great difficulty mission in Helldivers 2 eventually turns into chaos. Chargers crash through your squad, Automaton Dropships flood the map, and suddenly your carefully planned loadout stops working. That’s where choosing the best stratagems Helldivers 2 offers becomes the difference between extraction and total disaster.
After hundreds of Helldive difficulty runs, balance patch testing, and experimenting with solo and coordinated squad builds, one thing is clear: certain stratagems consistently outperform the rest because they solve multiple problems at once. Damage alone is not enough anymore. Cooldown management, survivability tools, mobility options, and team utility matter just as much in 2026.
Quick Answer
The best stratagems Helldivers 2 players should prioritize in 2026 are Orbital Laser, Eagle Airstrike, Shield Generator Pack, Railgun, and Autocannon Sentry. These picks dominate because they combine strong armor penetration, crowd control tools, short cooldown efficiency, and excellent synergy across both Terminid and Automaton missions.
For beginners, Eagle Airstrike and Supply Pack offer the safest value. High-level squads on Helldive difficulty usually combine Orbital Laser, anti-tank weapons, and defensive sentry turrets for maximum mission efficiency.
Introduction to Helldivers 2 Stratagems
Stratagems are the real backbone of combat in Helldivers 2. Primary weapons matter, but stratagem loadouts define your role during planetary missions.
What Are Stratagems in Helldivers 2?
Stratagems are tactical support abilities called down from your destroyer using directional input codes. They include support weapons, orbital strikes, eagle strikes, sentry turrets, defensive barriers, and mobility tools.
Some focus on explosive damage. Others improve survivability, build, or clear objectives.
A Railgun handles heavy enemy counters. Orbital EMS Strike locks down enemy waves. Shield Generator Relay protects your squad during extraction survival.
Why Stratagem Choice Matters in Higher Difficulties
Difficulty scaling changes everything.
Lower tiers let you brute force encounters with almost anything. Helldive difficulty punishes weak cooldown management and poor loadout synergy immediately. Enemy density increases, armored units appear constantly, and mission modifiers reduce your margin for error.
Here’s what most guides miss: the strongest stratagems are not always the highest damage options.
Reliable uptime matters more.
An Eagle Airstrike with consistent cooldown cycling often contributes more total value than a flashy Orbital 380MM HE Barrage that misses half the battlefield.
How This Tier List Was Ranked
This tier list evaluates:
| Criteria | Why It Matters |
| Cooldown efficiency | Determines sustained mission impact |
| Armor penetration | Essential against Chargers and Hulks |
| Team utility | Stronger squads clear faster |
| Ammo economy | Important for long operations |
| Versatility | Effective across multiple factions |
| Ease of use | Critical for beginners |
Testing included solo play builds, coordinated squads, bug missions, robot missions, and extraction missions after recent balance patch updates.
What Makes a Stratagem “Meta” in 2026?
The current meta revolves around three things:
- Fast cooldown rotations
- Reliable anti-armor options
- Battlefield control
That explains why Orbital Laser and Eagle Airstrike still dominate endgame loadouts despite repeated balancing adjustments.
Next, let’s break down the full Helldivers 2 stratagem tier list.
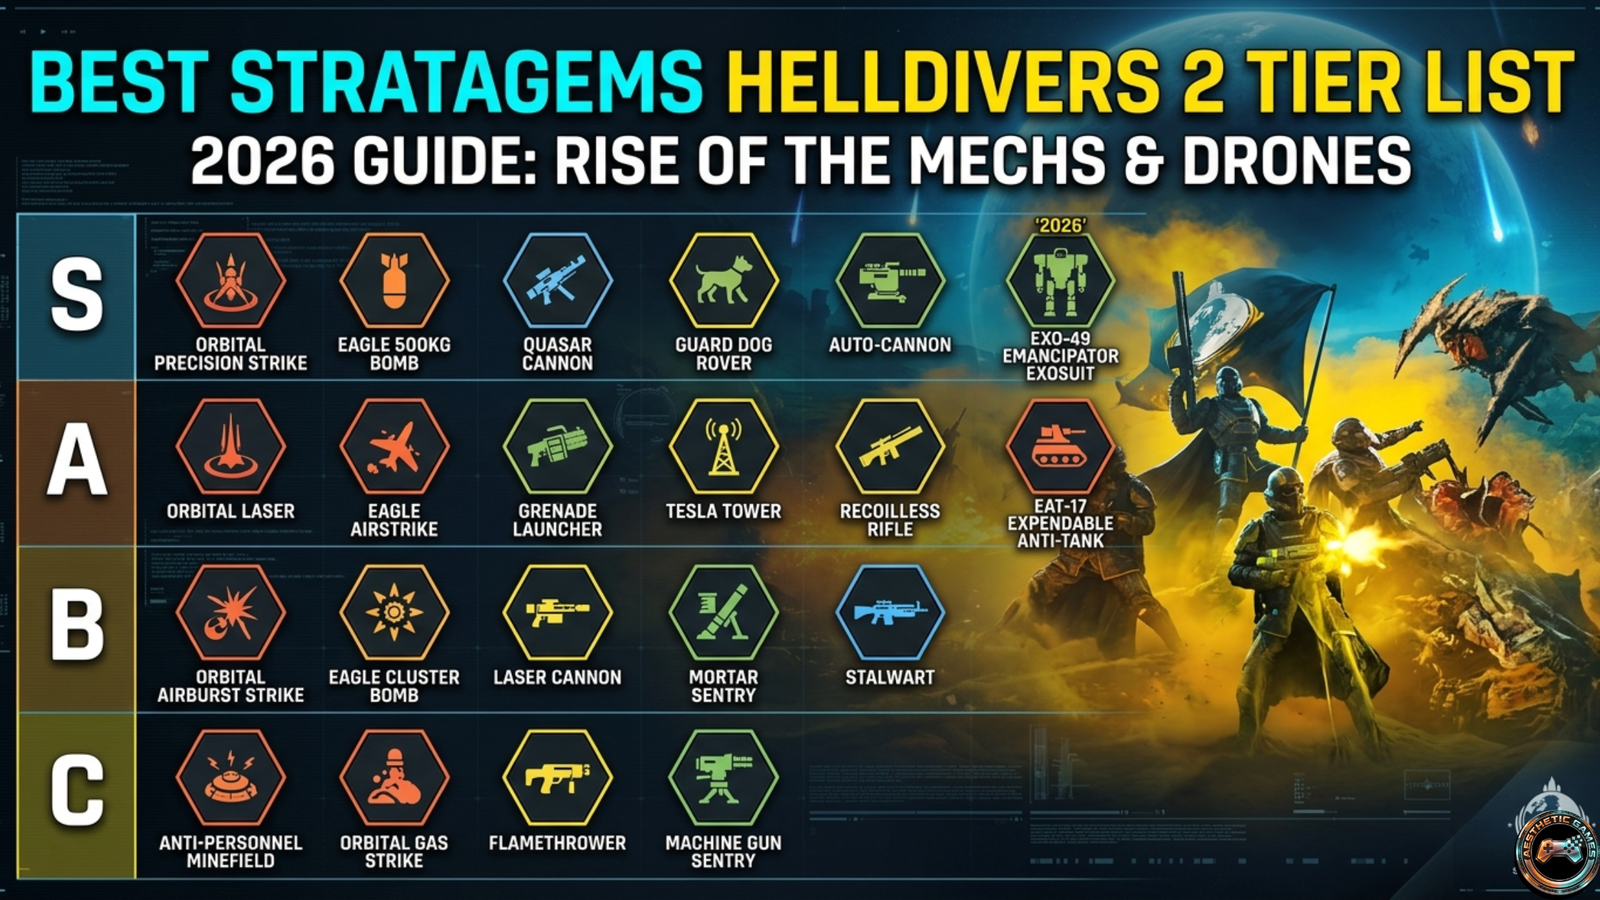
Helldivers 2 Stratagem Tier List Overview
The current best stratagems Helldivers 2 players rely on are spread across offensive utility, support backpack options, and automated defenses.
S Tier Stratagems (Best Overall Picks)
These dominate almost every mission type:
- Orbital Laser
- Eagle Airstrike
- Railgun
- Shield Generator Pack
- Autocannon Sentry
- Quasar Cannon
- Supply Pack
A Tier Stratagems (Reliable and Powerful)
Strong but slightly more situational.
- Orbital Railgun Strike
- Rocket Sentry
- Guard Dog Rover
- Eagle 500KG Bomb
- Recoilless Rifle
- EMS Mortar Sentry
B Tier Stratagems (Situational but Useful)
Useful for specific objectives or faction counters.
- Flamethrower
- Tesla Tower
- Jump Pack
- Heavy Machine Gun
- Eagle Smoke Strike
C Tier Stratagems (Niche or Outclassed)
These can work, but usually require specialized setups.
- Anti-Personnel Mines
- Incendiary Mines
- Orbital Smoke Strike
- Machine Gun Sentry
D Tier Stratagems (Weak or Rarely Worth Using)
Rarely worth a slot on higher difficulty missions.
- Ballistic Shield
- Orbital Walking Barrage
- RL 77 Airburst Rocket Launcher
Quick Summary Table of Best Stratagems
| Stratagem | Best Use Case | Difficulty Rating |
| Orbital Laser | Wave clearing | S Tier |
| Eagle Airstrike | Universal damage | S Tier |
| Railgun | Heavy armor | S Tier |
| Shield Generator Pack | Survivability | S Tier |
| Autocannon Sentry | Defensive positioning | S Tier |
That brings us to the absolute strongest options in the game right now.
Best S Tier Stratagems in Helldivers 2
Certain tools simply outperform the rest because they solve multiple combat problems simultaneously.
Orbital Laser — Best Crowd Clearing Stratagem
Orbital Laser remains absurdly strong in 2026.
It tracks targets automatically, melts elite enemy counters, and clears objective buildings with minimal player risk. Few stratagems offer this much combat optimization from a single input.
Against Terminids, it wipes entire swarms before they can overwhelm defensive positioning.
Against Automatons, it destroys clustered devastators and heavily armored enemies surprisingly fast.
Nothing handles chaotic extraction missions more consistently than Orbital Laser.
Eagle Airstrike — Best All-Purpose Damage Option
Eagle Airstrike fits into nearly every loadout.
Short cooldowns, flexible area of effect damage, and reliable projectile damage make it the safest offensive utility pick in the game.
In my experience, newer players underestimate how valuable rapid redeployment becomes during high-risk missions. Long cooldown orbital strikes leave dangerous downtime windows.
Eagle Airstrike does not.
Railgun Support Weapon — High Armor Penetration
Railgun still excels at anti-tank weapon duty despite previous nerfs.
Perfectly charged shots penetrate Hulks, Chargers, and heavy Automaton units efficiently. Skilled players can delete priority targets before they threaten squad coordination.
The downside?
Missing shots punishes your ammo economy badly.
Shield Generator Pack — Best Defensive Utility
Shield utility becomes mandatory at greater difficulties.
Shield Generator Pack gives breathing room during revives, objective interactions, and bunker defense situations. That extra survivability often saves entire missions.
Autocannon Sentry — Top Defensive Stratagem
Few automated turret builds offer this much value.
Autocannon Sentry destroys medium armored enemies quickly and contributes sustained DPS across long engagements. Proper turret placement creates massive map control advantages.
Place it behind natural cover whenever possible to improve weapon uptime.
Why These Stratagems Dominate Endgame Missions
They all share one trait:
They remain effective even when missions spiral out of control.
That reliability matters far more than flashy damage numbers.
Best Stratagems for Different Playstyles
Not every player approaches missions the same way.
Best Solo Stratagem Loadouts
Solo players need flexibility and self-sustenance.
Best picks:
- Guard Dog Rover
- Eagle Airstrike
- Shield Generator Pack
- Quasar Cannon
These reduce pressure while maintaining mobility options.
Players learning how to play Helldivers 2 solo benefit massively from automated defenses and support backpack tools.
Best Team Support Stratagems
Cooperative gameplay rewards specialization.
Strong support role builds include:
- Supply Pack
- EMS Mortar Sentry
- Shield Generator Relay
- Orbital EMS Strike
If you’re wondering how to use the supply pack Helldivers 2 mechanics effectively, focus on feeding ammo to heavy weapon teammates during sustained firefights.
Best Anti-Tank Stratagems
Chargers and Bile Titans demand armor-breaking attacks.
Top anti-armor options: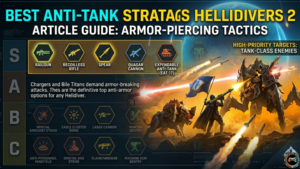
- Railgun
- Recoilless Rifle
- Spear
- Quasar Cannon
- Expendable Anti Tank
Best Crowd Control Stratagems
Enemy waves become overwhelming quickly on Helldive difficulty.
Best crowd control tools include:
- Orbital Laser
- Eagle Cluster Bomb
- Orbital Gatling Barrage
- Flamethrower
Best Mobility and Survival Stratagems
Mobility matters more than raw damage during stealth approaches and objective clearing.
Jump Pack and Shield Generator Pack remain the strongest survival picks.
Best Stratagems for Beginners
New players should avoid overly technical loadouts early.
Best beginner options:
- Eagle Airstrike
- Machine Gun
- Supply Pack
- Gatling Sentry
These provide forgiving gameplay without complicated timing windows.
Next, faction-specific builds become extremely important.
Best Stratagem Loadouts by Enemy Faction
Different enemies require different tactical deployment strategies.
Best Stratagems Against Terminids
Terminids overwhelm players through sheer numbers.
Best counters:
- Flamethrower
- Orbital Laser
- Eagle Cluster Bomb
- Gatling Sentry
Area denial matters more than precision damage here.
Best Stratagems Against Automatons
Automatons punish weak armor penetration.
Bring:
- Railgun
- Orbital Railgun Strike
- Recoilless Rifle
- Shield Generator Pack
Best Stratagems Against Illuminate
Illuminate units rely heavily on mobility and shield mechanics.
Strong counters include:
- Arc Thrower
- Orbital Precision Strike
- EMS tools
- Guard Dog Rover
Recommended Team Compositions
Balanced squads perform best.
A strong four-player composition usually includes:
- One anti-tank specialist
- One crowd control player
- One support role
- One defensive utility player
Common Mistakes Players Make Against Each Faction
Biggest mistakes include:
- Using explosive ordinance too close to teammates
- Ignoring cooldown rotations
- Poor turret placement
- Overstacking anti-armor weapons
Friendly fire still kills more Helldivers than enemies do.
How to Unlock New Stratagems in Helldivers 2
Unlock priorities matter more than most beginners realize.
How the Acquisition System Works
Players spend Requisition Slips to unlock new stratagems through ship modules.
Some upgrades dramatically improve combat efficiency while others barely affect gameplay.
Earning Requisition Slips Fast
Fastest methods include:
- Defense missions
- Eradication missions
- great difficulty farming runs
Which Stratagems to Unlock First
Best early priorities:
- Eagle Airstrike
- Supply Pack
- Recoilless Rifle
- Shield Generator Pack
Best Early Game Purchases
Beginners should focus on utility picks instead of flashy orbital barrages.
Reliable cooldowns outperform risky, serious damage tools early on.
Late Game Stratagem Priorities
Late progression focuses heavily on endgame loadouts and faction-specific counters.
That naturally leads to mission-specific optimization.
Best Mission Specific Stratagems
Different objectives reward different builds.
Best Stratagems for Defense Missions
Strongest defensive stratagems include:
- Autocannon Sentry
- Rocket Sentry
- EMS Mortar Sentry
- HMG Emplacement
Best Stratagems for Extraction Missions
Extraction survival requires layered battlefield control.
Best choices:
- Orbital Laser
- Eagle Airstrike
- Shield Generator Relay
- Gatling Sentry
Best Stratagems for Eradication Missions
Wave clearing dominates these operations.
Bring explosive barrages and automated defenses whenever possible.
Best Stratagems for Stealth Objectives
Stealth approaches benefit from:
- Eagle Smoke Strike
- Jump Pack
- Orbital Smoke Strike
Best Stratagems for Helldive Difficulty
High-level gameplay demands efficient loadout synergy.
Strong Helldive combinations include:
- Orbital Laser
- Railgun
- Shield Generator Pack
- Eagle Airstrike
Advanced Stratagem Tips and Pro Strategies
Good players use strong stratagems.
Great players maximize timing.
How to Chain Stratagems Efficiently
Layer cooldowns instead of overlapping everything immediately.
Example:
Use EMS first. Follow with Eagle Airstrike. Finish survivors using sentry turrets.
Cooldown Management Tips
Avoid wasting high cooldown abilities on small patrols.
Save Orbital Laser for elite enemy counters or extraction emergencies.
Positioning for Maximum Effectiveness
Defensive positioning changes mission outcomes dramatically.
Imagine you’re defending an uplink objective against Automatons. Placing an Autocannon Sentry on elevated terrain behind cover increases survivability while improving firing angles.
Tiny positioning differences often decide whether turrets survive 10 seconds or 2 minutes.
How to Avoid Team Kills
Most accidental deaths happen because players panic-throw stratagems near teammates.
Communicate before using explosive damage tools.
Combining Stratagems With Weapons and Armor
Strong builds always combine:
- Armor penetration
- Ammo sustain
- Crowd control
- Survivability tools
High-Level Squad Coordination Strategies
Coordinated squads dominate because they specialize in roles efficiently.
One player handles support backpack management. Another focuses entirely on anti-armor duty.
That specialization massively improves mission efficiency.
Most Overrated and Underrated Stratagems
Not every popular pick deserves its reputation.
Stratagems That Look Strong but Underperform
Orbital 380MM HE Barrage looks incredible visually.
Actual combat performance feels inconsistent due to spread patterns and friendly fire risks.
Hidden Gems Most Players Ignore
EMS Mortar Sentry remains criminally underrated.
It creates battlefield control without constant babysitting.
Buffed Stratagems Worth Revisiting
Recent turret buffs improved:
- Rocket Sentry
- Machine Gun Sentry
- Tesla Tower
Community Meta vs Actual Effectiveness
Community meta trends often favor flashy damage.
The honest answer is that utility picks quietly carry more successful extractions than raw burst damage.
Frequently Asked Questions About Helldivers 2 Stratagems
What Is the Best Stratagem in Helldivers 2?
Orbital Laser currently offers the best overall balance of damage, survivability, and objective clearing.
Which Stratagems Should Beginners Unlock First?
Eagle Airstrike, Supply Pack, and Shield Generator Pack provide the safest early value.
What Are the Best Solo Stratagems?
Guard Dog Rover, Quasar Cannon, and Eagle Airstrike perform exceptionally well for solo play builds.
Which Stratagems Are Best for Automatons?
Railgun, Recoilless Rifle, and Orbital Railgun Strike handle armored Automaton enemies efficiently.
Are Sentry Stratagems Worth Using?
Absolutely. Proper turret placement dramatically improves defensive positioning and wave clearing.
What Is the Fastest Way to Unlock Stratagems?
High difficulty defense missions provide the fastest requisition farming methods.
Final Thoughts on the Best Helldivers 2 Stratagems
The current best stratagems Helldivers 2 players should prioritize all share the same strengths: reliability, versatility, and strong cooldown efficiency.
Orbital Laser dominates crowd control. Eagle Airstrike remains the safest all-purpose option. Shield Generator Pack consistently saves runs during great difficulty missions.
New players should focus on simple, flexible loadouts first instead of chasing risky meme builds. Veterans helping recruits often overlook how valuable beginner-friendly tools really are.
Meta shifts will happen again as balance patch updates continue. Still, the core rule probably will not change anytime soon:
The strongest stratagems are the ones that solve multiple battlefield problems at once.
Before your next mission, spend a few runs experimenting with faction-specific builds and cooldown rotations. Small loadout adjustments can completely transform your success rate on Helldive difficulty.